Fuji 23mm f1.4 compared to Voigtlander 17.5mm f0.95

The 35mm field if view is definitely my favourite lens.  The Voigtlander Micro Four thirds 17.5mm f0.95 is an incredible lens, and it renders photos out of camera wonderfully.  However it’s a bit of a heavy beast to lug around.  I wondered how the equal field of view and almost equal depth of field Fuji 23mm f1.4 would compare.   Paired with my X-A1 it’s noticeably lighter.

E-M5 Mkii – 496g (Camera) + 540g (lens) = 1.036kg

Fuji X-A1 –    330g (Camera) + 301g (lens) = 0.631kg

or if you add the X-T2, which I don’t have, it’s a bit closer

Fuji X-T2 –    501g (Camera) + 301g (lens) = 0.802kg

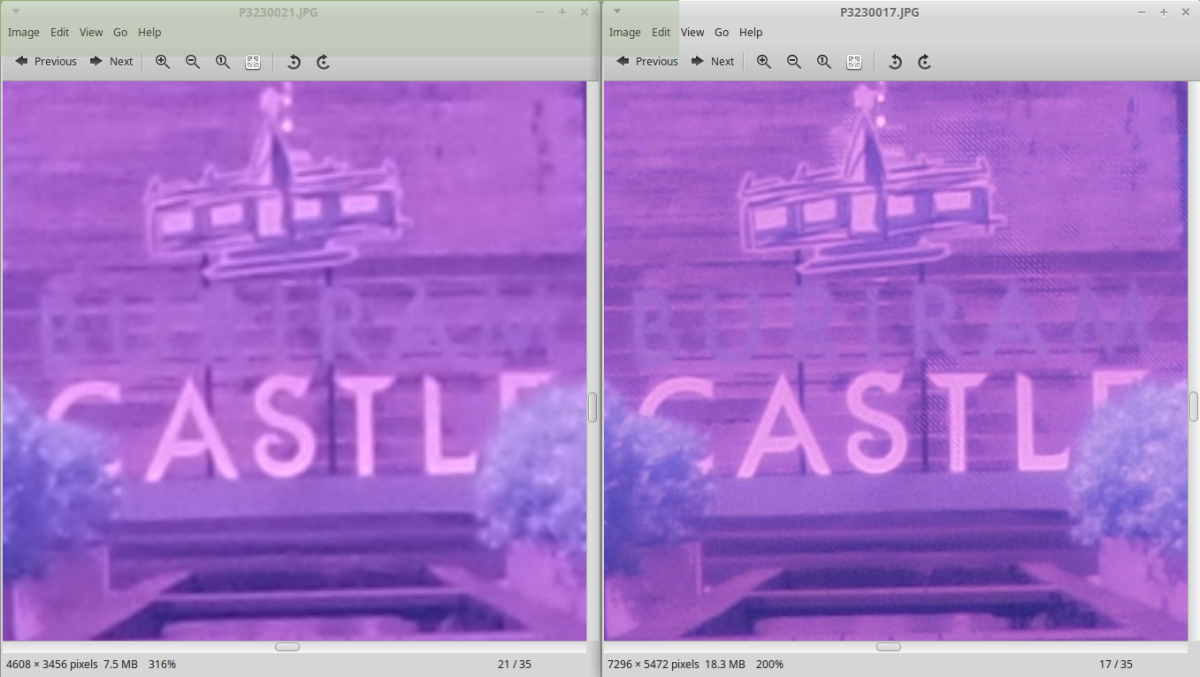
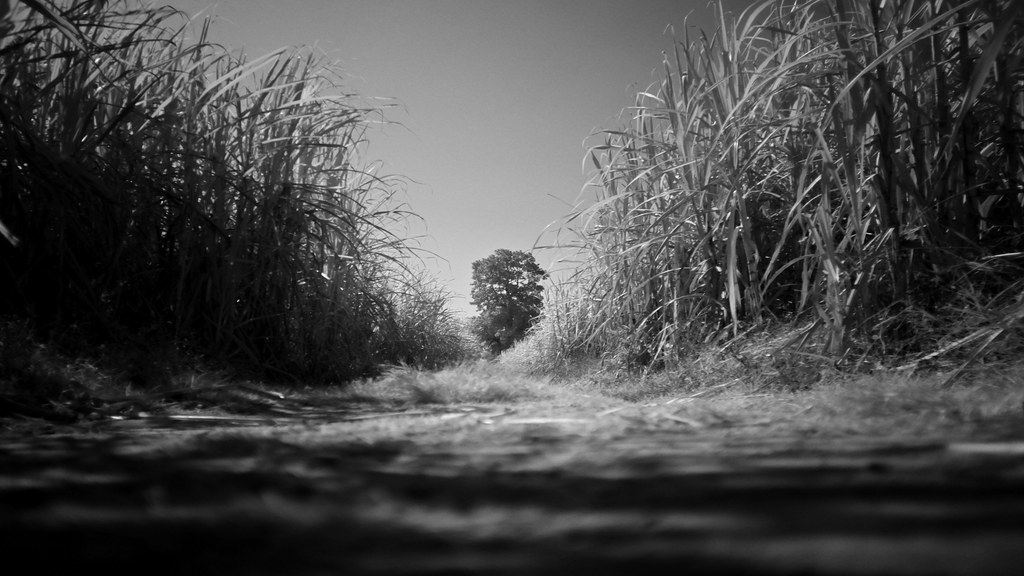
The following images have been cropped for consistency, and exposure adjusted to try and make them as easy to compare as possible.  In my experience the Fuji’s all seem to expose to the right (over) whilst Olympus expose to the left (under).  All Voigtlander shots wide open at f0.95 and all Fuji shots wide open at f1.4


water can v 09
Voigtlander 17.5mm f0.95
water can f 14
Fuji 23mm f1.4


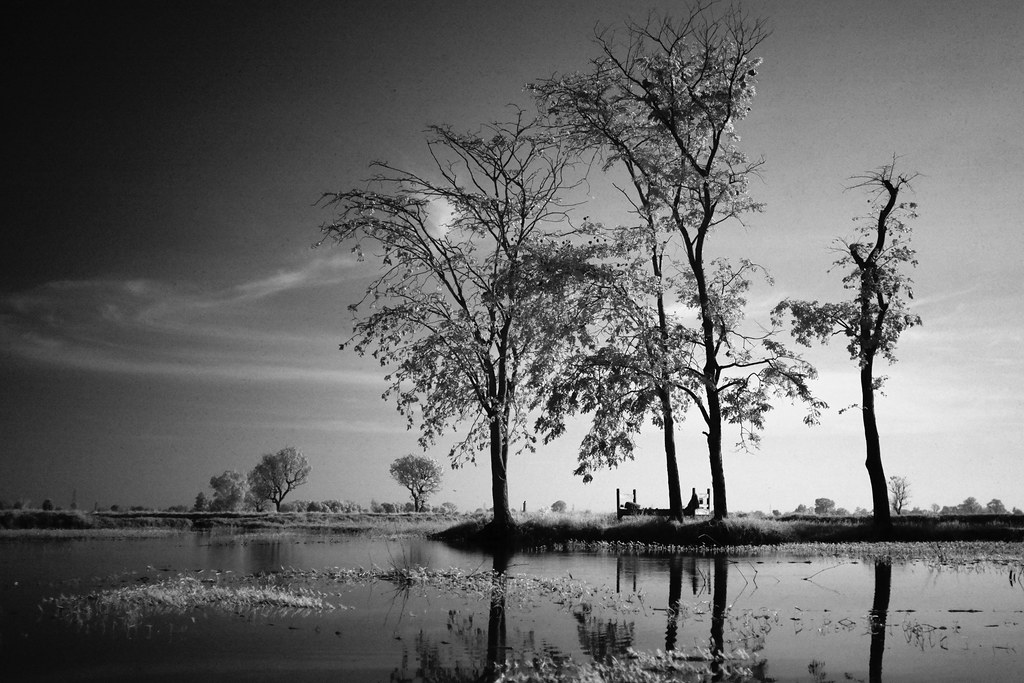
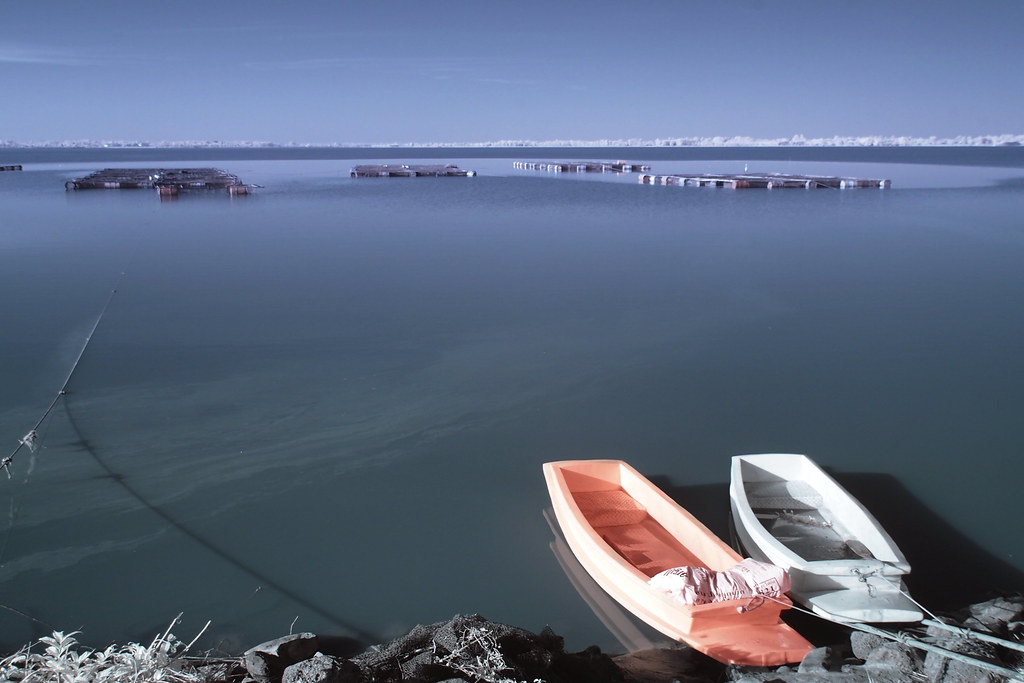
The first thing you notice is the vignette on the Voigtlander wide open, the fuji is much more even across the frame.


grass v 09
Voigtlander 17.5mm f0.95


grass f 14
Fuji 23mm f1.4


Along with the vignette the Voigtlander also has a more “glowy” out of focus look, albeit not quite as sharp as the Fuji.


stepping stones v 09
Voigtlander 17.5mm f0.95
stepping stones f 14
Fuji 23mm f1.4


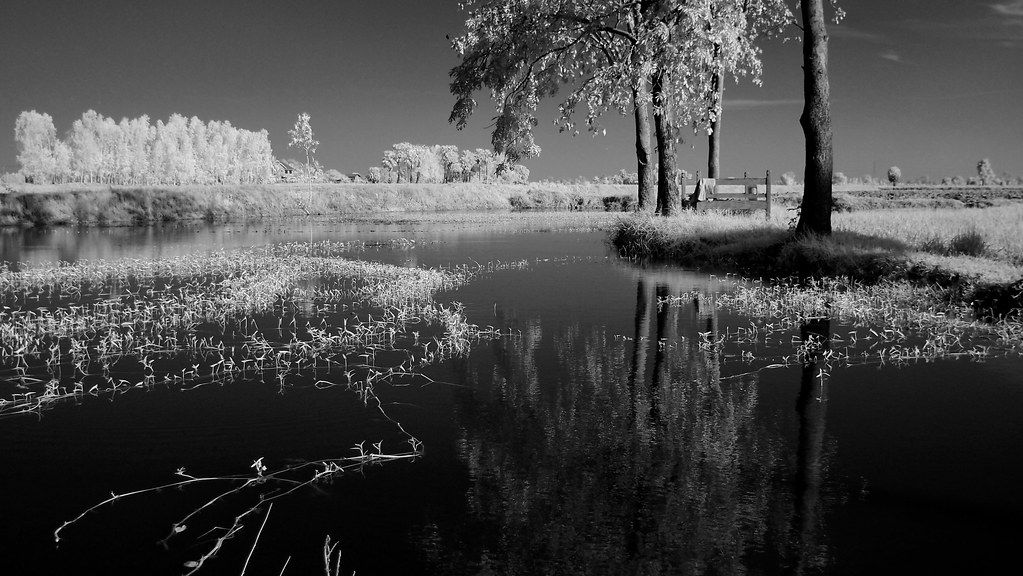
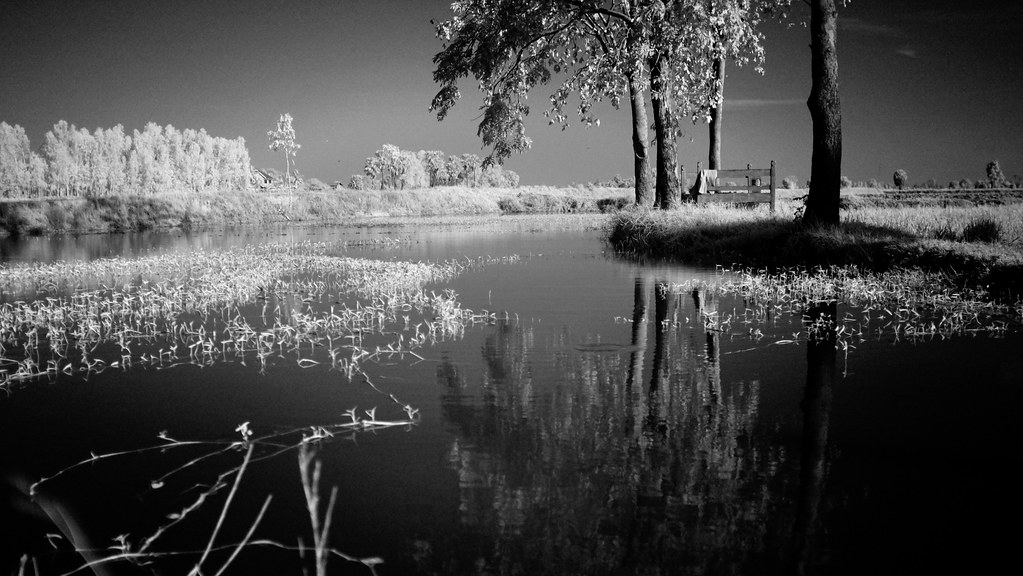
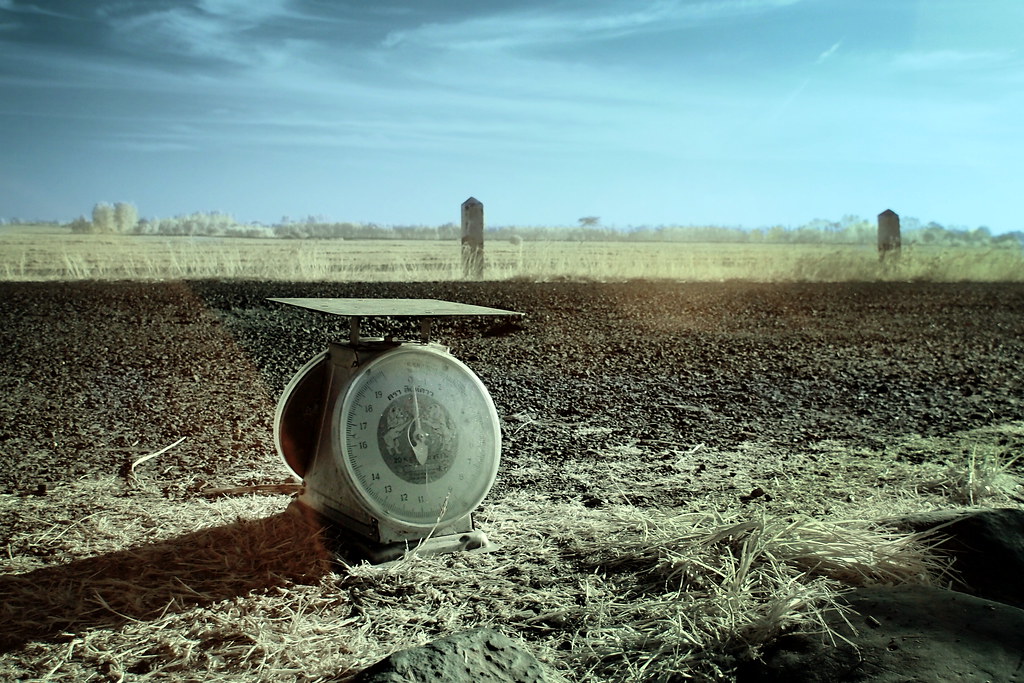
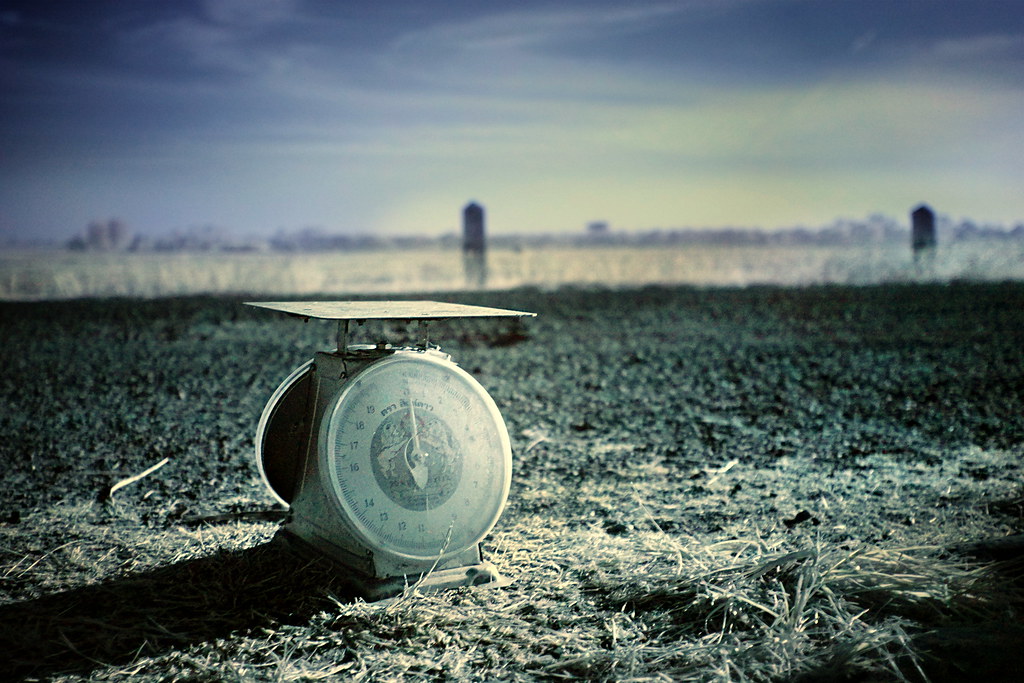
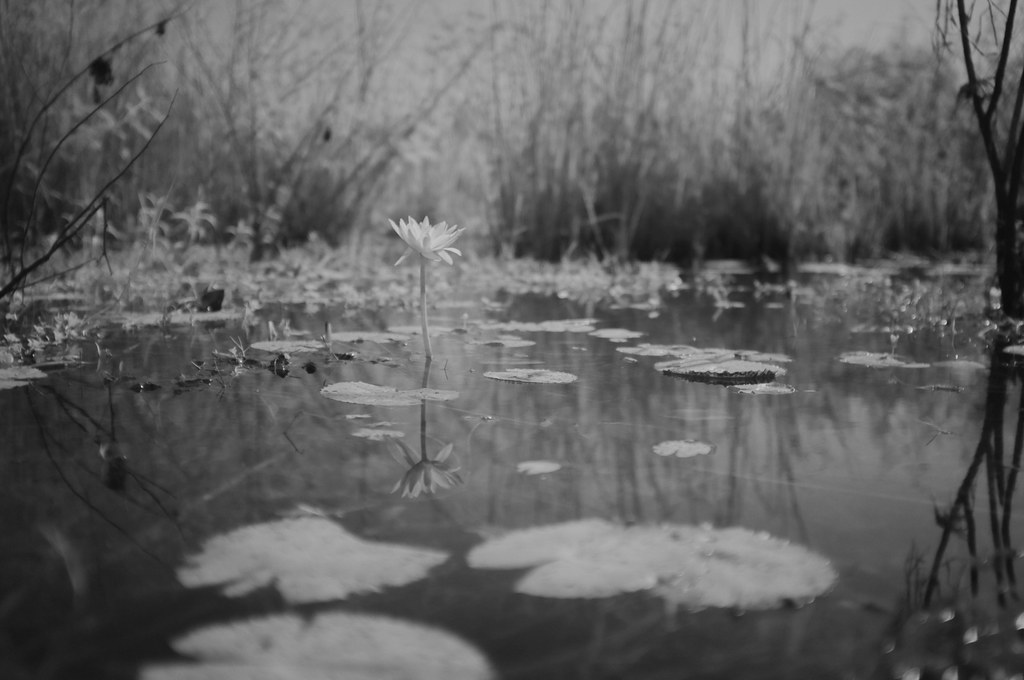
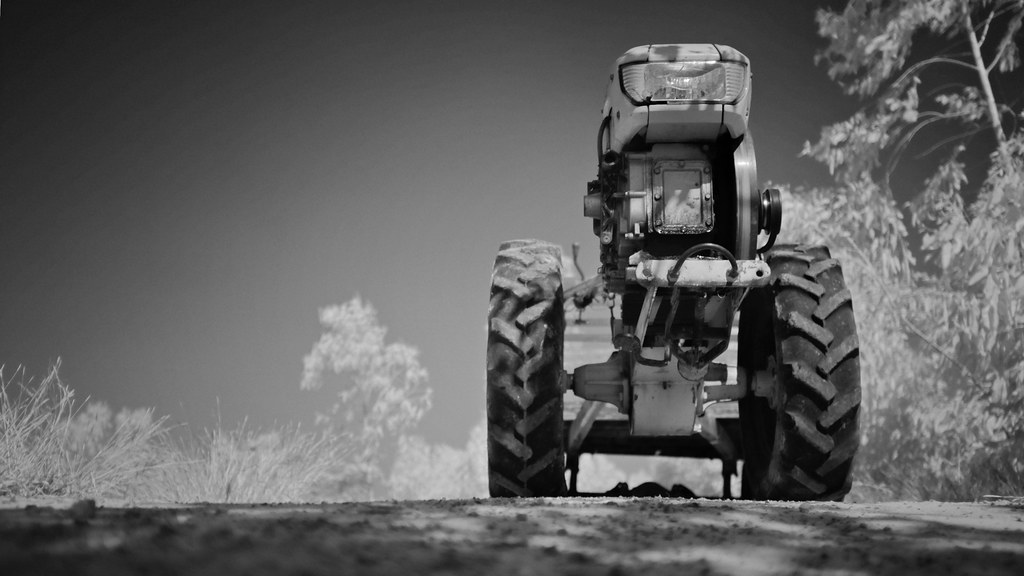
When the subject is a few metres away there doesn’t appear much difference between the two.


digger v 09
Voigtlander 17.5mm f0.95
digger f 14
Fuji 23mm f1.4


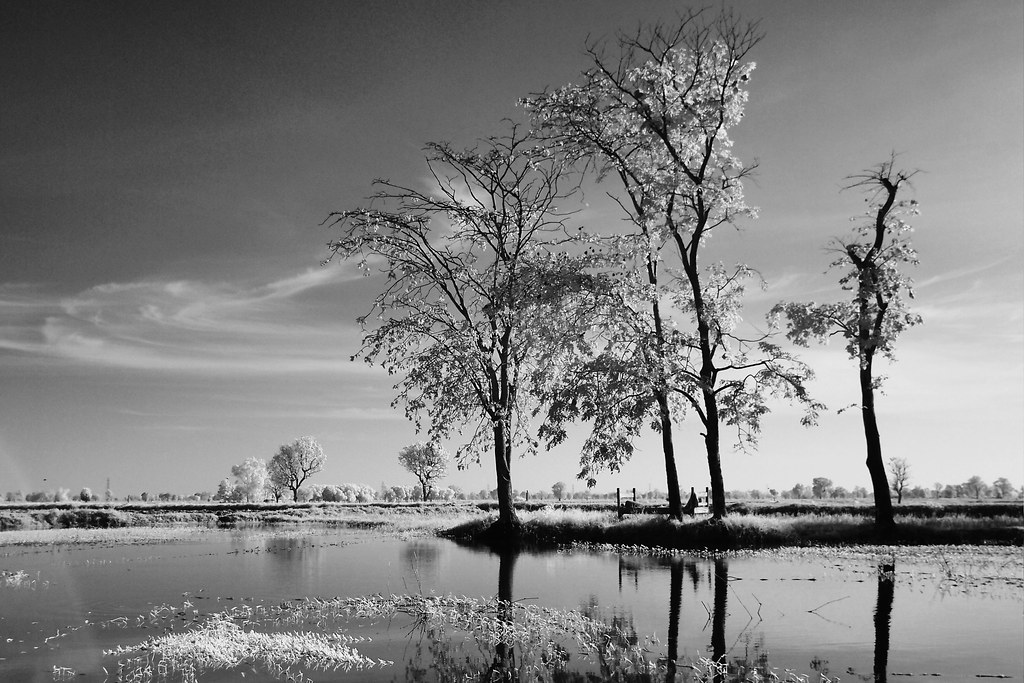
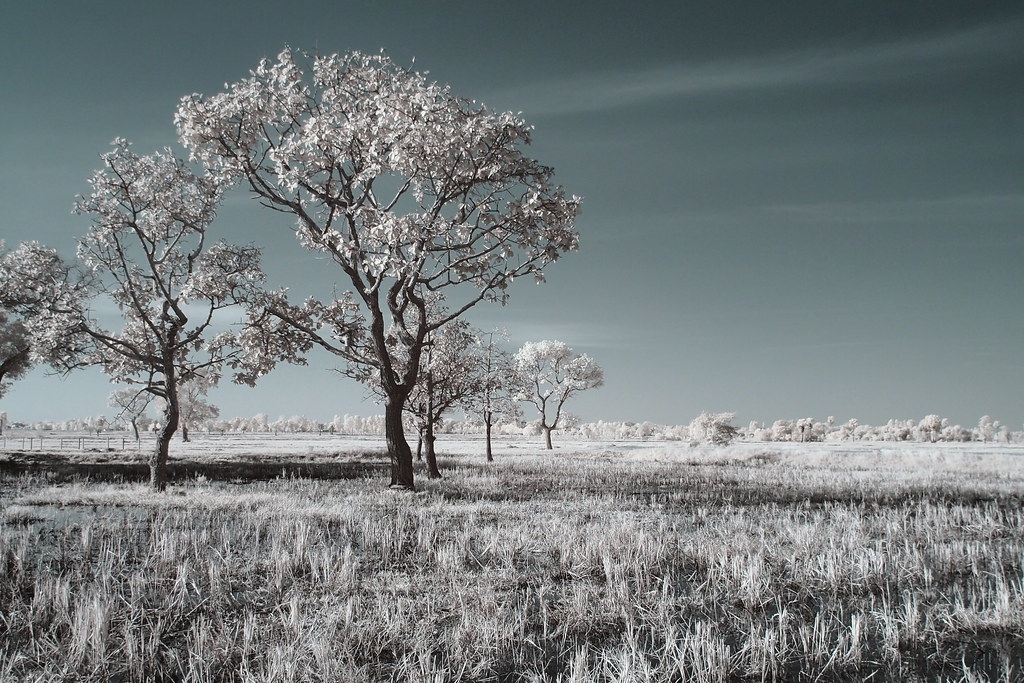
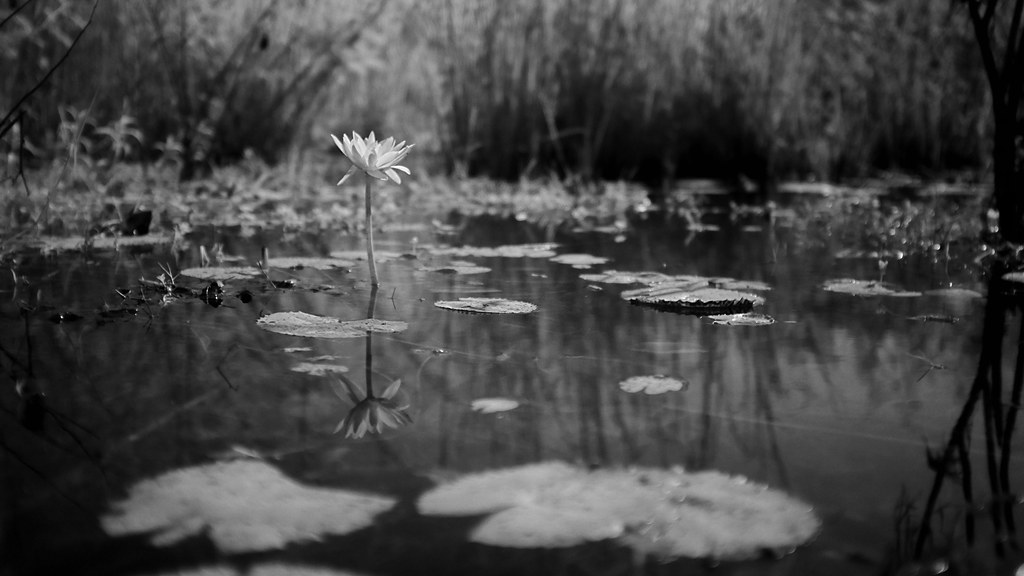
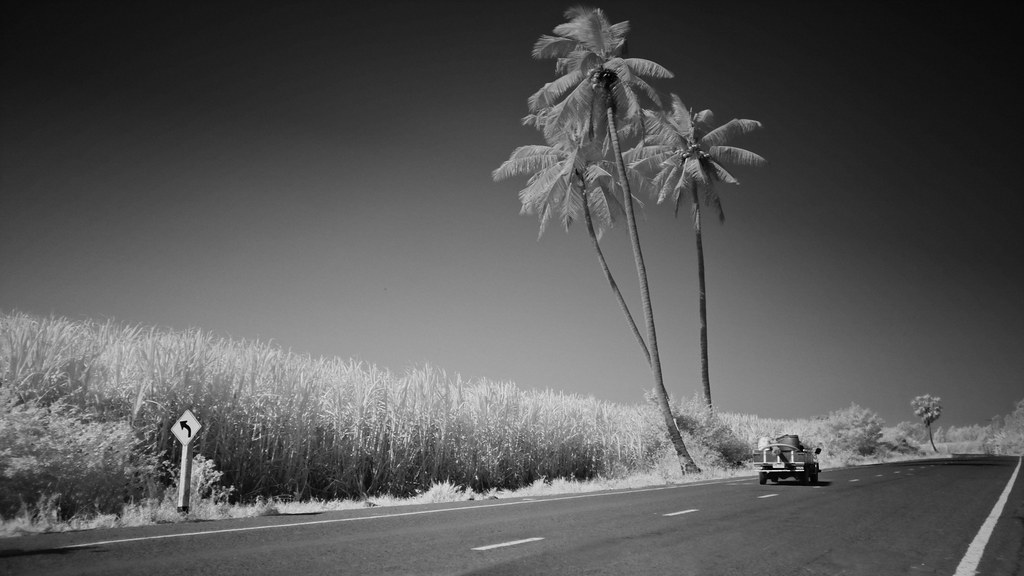
The Fuji definitely holds it’s own in terms of rendering, and the Auto Focus is a nice option over the manual focus only Voigtlander.   The below images are not identical, but both have some post processing, including adding some vignette to the Fuji to try and make it resemble the Voigtlander.


OLYMPUS DIGITAL CAMERA
Voigtlander 17.5mm f0.95
market seller f 14
Fuji 23mm f1.4


In conclusion I think the out of camera rendering of the Voigtlander is quite special, leaving the Fuji looking slightly clinical, and technically more perfect.   However with a little bit of post processing it is hard to pick which lens is which, I’m probably going to use the lighter Fuji system a bit more often.


Olympus Live Composite & infrared

The Olympus “Live Composite” mode is one of those hidden gems you don’t normally get around to until you had the camera for a few months.  It’s particularly useful for night time long exposures, it prevents images being over exposed and it keeps noise levels very low even when exposing for 15 mins or more.   To find this mode you put the camera in manual mode and then ramp the exposure up beyond 60 seconds where you will find Bulb, Live time, and Live Composite.

You dial in to Live Composite, then hit “menu” and you can enter your exposure step time.  This is the time each image will be exposed for and then over layed one on top of the other, automatically in the camera.   It only adds light and will not let you over expose as long as your step time is correct.  (for instance if your camera at F4 and ISO 200 requires a 2 second exposure and you set your step time for 2 seconds you will be fine).

During daylight you can use an unconverted camera and an infrared filter to get long exposure times that will work with “Live Composite”.   Water and Clouds work well.

OLYMPUS DIGITAL CAMERA
IR720 filter, Live Composite Mode, Red and Blue channel swap in GIMP

The above image was taken using 37 x 3.2 second steps @ f7.1  (total 120 seconds).  Oly 9-18mm lens, unconverted OMD E-M5 mkii.

I did a quick behind scenes video making an IR Live Composite image.  The link is below, have fun.

Olympus Live Composite Infrared You Tube Video

OMD E-M5 MKii Infrared High Res Mode

It has taken me some time but I have finally got my hands on an Olympus OMD E-M5 Mkii to test out it’s Infrared capabilities, particularly with respect to High Res mode.  There are not really a lot of choices for native Micro Four Thirds Infrared lenses, but the 9-18mm is a stand out.  I’ve never experienced any hot spots with this lens and it’s nice and wide.  Of course using it on an off the shelf camera (not infrared converted) you expect some long exposure times, but using the High Res mode on the E-M5 you need a tripod anyway, so a good fit.

All shots taken with Olympus 9-18mm f4-5.6 wide zoom, and cheap $13 no name 720nm Infrared filter from Ebay.   As mentioned in previous posts, I have tried $100 IR filters and I see no difference at all compared to the cheap ones.
Buriram Castle IR single left IR high res right

left is standard single image, right is high res mode

Both images taken on a tripod with the same exposure, 4 seconds @f5.6, 18mm.  The High res mode takes longer with it’s multiple images and then it’s stitching.
Buriram Castle zoom castle

zoomed in pixel peeping, 316% on the single image left, and 200% on the high res image right

The extra resolution is apparent when pixel peeping.  There were people walking about constantly during these shots, Buriram castle is a bit of a tourist attraction.  In the single exposure at 4 seconds the people just blend away and become invisible.  On the High res shot they leave some torn jagged artefacts in the image.  So on the plus side you get extra resolution, on the negative you get some artefacts.


Buriram Castle zoom sign

zoomed in pixel peeping, 273% on the single image left, and 173% on the high res image right

Looking at signs in the image the resolution advantage is quite clear.  I have read some reviews discussing the fact that you need the Oly pro lenses to make the high res mode worth while.  However all the lenses I have tested in Hi Res mode show an increase in resolution, some more than others, but all show an improvement, even the cheap 12-50mm which is the least sharp Micro four thirds lens I have tried does show an improvement in high res mode.


Tree dam IR left single right high res

left is standard single image, right is high res mode

Looking at another example with some wind blowing through reeds, branches and some water movement.  Exposure 2 seconds @f5.6, 11mm.

Tree pond zoom in lilly


zoomed in pixel peeping, 203% on the single image left, and 129% on the high res image right

The 2 second exposure is enough to create some glassy water effects in both the single image and the high res mode.  The waving reeds in the breeze cause a little motion blur in the single shot, and again some jagged artefacts in the high res shot.


tree lake side.jpg

Processed High Res Image 

Just to get a little more extreme it is fun to stitch some of these high res shots together in Hugin to make even bigger files.  The artefacts are there, but you have to really pixel peep to notice.


Tree Dam IR High res Hugin stitch R&B swap.jpg

Processed High Res, Hugin Stiched (3 images) 65Mp 12407 x 5280 pixels

Click for Flickr High res image


Fuji 14mm f2.8 lens & infrared

fuji x-a1 14mm f2-8 ir720

converted fuji x-a1, fuji 14mm f2.8 with reversible hood, IR720 filter, LB-XM1 grip

The Fuji 14mm f2.8 lens is one of those not so common mirrorless lenses with now visible hot spots.  It’s perfect at f2.8, and good throughout the range.  The after market LM-XM1 grip is a great accessory, fits snugly, you can change battery and cards without removing the grip, and the V plate is very handy.  The lens hood fits over the filter in either forward or reverse orientation, perfect for travelling.  The filter thread is 58mm the front of the lens doesn’t move.

Tao crossing the road i

converted fuji x-a1, fuji 14mm f2.8, IR720 filter

I use the lens mostly on a full spectrum converted X-A1 and an IR720 filter.  The in focus is crisp and the defocus pleasant.  The IR doesn’t interfere with the auto-focus at all.

temple monkey

converted fuji x-a1, fuji 14mm f2.8, UV380 short pass filter

The UV380 short pass filter is great for black and white, high contrast, nice whites, but not good for colour.  It also works fine on the 14mm f2.8 lens, again no hot spots.

tree branch ir

converted fuji x-a1, fuji 14mm f2.8, IR720 filter

The images are crisp with heaps of contrast, the lens never fails to deliver interesting IR images.

heyder centre iii with guard sq

standard fuji x-a1, fuji 14mm f2.8, IR720 filter, tripod

The 14mm f2.8 also works fine on a non converted camera (unconverted X-A1 used above) it’s just your exposure times are obviously a bit longer.

All in all a fantastic wide angle Fuji Infrared lens for landscape and architecture.

Unconverted Fuji x-a1 with Jupiter-11 and IR720 filter

At 135mm f4 the Jupiter-11 is not a lens most people would think of, but it can be fun to try such a telephoto for some interesting infrared results.  The Jupiter-11 has no discernible IR hot spots.  A hot spot is the centre circle of over exposure you get in infrared with many lenses due to the way the infrared light bounces around and focuses inside the lens.

With an unconverted (off the shelf) camera you are going to want to use a tripod most of the time, at the largest aperture of f4 at ISO200 you get around 2-5 second exposures, which can make for some great motion blur, clouds or water.  You will want to use the 2 second timer just to prevent camera shake.  The Fuji x-a1 is extremely clean when using long exposures (as are all the Fuji X cameras) and is well suited to IR.

fuji x-a1, jupiter-11, 5 second exposure

Hand holdable shots are also possible at f4 in full sun at ISO3200 if you have a steady hand.  I generally set the camera to motor drive hold my breath and shoot 10 or 12 images in succession, you get a couple of sharp ones.  The below image was taken at 1/13th of a second.

hand held infrared, ISO3200 fuji x-a1, jupiter-11, IR720, 1/13th second

I have also been experimenting with Hugin Panorama Stitch with is a free program which combine multiple images.  It works fine with infrared and if you already have the camera on a tripod it’s no big deal.  Just put a bit a bit of overlap in between shots.  Once the 4 images were stitched together I loaded the result in to GIMP to do the Red and Blue colour swap, the X-a1 produces some nice colour separation in infrared, which means you are not limited to black and white.

fuji x-a1, jupiter-11, ir720, 4 image hugin stitch

Technical details
Camera – Fuji X-a1 bayer CFA
Lens – Jupiter-11 135mm f4, LTM39 mount
Lens Adaptor – Fotasy L39-FX
Filter Adaptor – 40.5mm to 52mm (only used because most of my filters are 52mm)
Filter – 52mm IR720 (no name $13 filter)
Tripod mount/Grip – LB-XM1 (after market grip which allows access to memory card and battery)

Fuji X100 infrared compared to Converted Olympus E-PM1

Just for fun I thought I would compare my IR converted E-PM1 with my Fuji X100, both with an IR720nm filter.  The E-PM1 has the IR blocking filter removed so shooting hand held at any f-stop is no problem.  The fuji is off the shelf but is still good for hand held IR shots at f2 and ISO1600.  At those settings the Fuji X100 shutter speed is normally around 1/30th of a second, which is completely fine for hand held as long as you’re careful.

All the images have been processed in GIMP, if anyone is interested there is a tutorial here -> https://www.youtube.com/watch?v=jlQ0qDpMktI

The gear used;

Converted Olympus E-PM1 (IR hot filter removed)
Olympus 9-18mm lens (almost no hot spot, great for IR)
ISO 200

Fuji X100 (standard off the shelf)
23mm f2
ISO 1600

Black and white images first
Olympus E-PM1 image on top, Fuji X100 image below

1 Bed lake side processed bw EPM1
2 Bed lake side processed bw FUJI

9 Tree lake front processed BW EPM1
10 Tree lake front processed BW FUJI

Colour processed images of the same scene, E-PM1 (top) and Fuji (below)

11 Tree lake front processed EPM1
12 Tree lake front processed FUJI

A close up scene to show the difference in depth of field.  The Fuji really deals well with lens flare in this situation, the Oly less so, but of course it’s art.   E-PM1 at f5.6 (top) and the Fuji being at f2 (below)

5 Scales processed EPM1
6 Scales processed FUJI

The E-PM1 tends to have more subtle colours, with the Fuji being more bold, the processing used is not exactly the same as the files are quite different, but I tried to make them similar.  E-PM1 (top) and Fuji (below)

7 Tree processed EPM1
8 Tree processed FUJI

3 Boat processed EPM1
4 Boat processed FUJI

Fuji X100

Fuji X100 hand held infrared (unmodified standard camera)

It has been a real delight to find out just how good the X100 is for Infrared, it’s a combination of having a virtually hot spot free lens, and clean files up to ISO1600.
The shutter speeds in full sun with an IR720nm filter at ISO1600 tend to be around 1/30th of a second which is hand holdable this lens, just make sure you take a few shots of the same scene in case on or two end up with motion shake.

The below image is an Out of Camera JPG with the following settings;

  • Infrared 720nm filter
  • Black and White
  • ISO1600
  • DR400
  • Shadow Tone – Hard
  • Highlight Tone – Normal

Lilly

All the images below have the same settings as above, but a little contrast and curve adjustment in post processing (GIMP).

Lilly

cane field road line

cane field

tractor

Palm Road and truck